Garage Merch                Ron Pope Motorsports                California Custom Roadsters               

Keepers build

I sure wish people would mount a Jag, just like the factory, only you can make it look trick, but work just as well or even better, not solid like my plans say to do, I found that I was way off base when I first did them that way... There is so very much leverage with big tires and the pinion, that are both trying to rotate that third member, and in two different directions, both sideways/twisting and forward and back... Buy running the lower braces at least straight forward, you are helping to keep the third member from taring itself loose from the frame and the mounting plate, and I said to use 3/8" plate for that third member mounting plate, I was wrong! in a solid mount, that is not near strong enough (if you are going to drive a T Bucket, near as hard as I drive mine) 5/8" would be a bit better, but I still would change everything and mount it all with rubber type (big 4 bar bushings or big rear spring bushings) and a strong either single or hairpin type rear radius rod (like the factory uses a flapper arm/bar, what I call a flapper bar, but a strong radius rod, none the less) as the lower radius rod will now keep the whole setup from twisting forward and breaking the rubber mounts, when on the load pedal, only the small movement from the bushings, and this movement will make that whole system live... and the stock Jag housing/tin cover also has travel stops that the outer Alum flange carriers,,, these stops bottom out on, BEFORE the U joint gets to that bad bind point of no return, or failure... I hate to admit that I have had to fix a few of my own jobs over the years for this very reason, as they say, drive them and learn, sometimes the HARD way!
soapbox.gif
 
I sure wish people would mount a Jag, just like the factory, only you can make it look trick, but work just as well or even better, not solid like my plans say to do, I found that I was way off base when I first did them that way... There is so very much leverage with big tires and the pinion, that are both trying to rotate that third member, and in two different directions, both sideways/twisting and forward and back... Buy running the lower braces at least straight forward, you are helping to keep the third member from taring itself loose from the frame and the mounting plate, and I said to use 3/8" plate for that third member mounting plate, I was wrong! in a solid mount, that is not near strong enough (if you are going to drive a T Bucket, near as hard as I drive mine) 5/8" would be a bit better, but I still would change everything and mount it all with rubber type (big 4 bar bushings or big rear spring bushings) and a strong either single or hairpin type rear radius rod (like the factory uses a flapper arm/bar, what I call a flapper bar, but a strong radius rod, none the less) as the lower radius rod will now keep the whole setup from twisting forward and breaking the rubber mounts, when on the load pedal, only the small movement from the bushings, and this movement will make that whole system live... and the stock Jag housing/tin cover also has travel stops that the outer Alum flange carriers,,, these stops bottom out on, BEFORE the U joint gets to that bad bind point of no return, or failure... I hate to admit that I have had to fix a few of my own jobs over the years for this very reason, as they say, drive them and learn, sometimes the HARD way!
soapbox.gif

Oh sure NOW you tell me :D

With this rear end having 2.88's in it. Really pounding it hard is not an option!
 
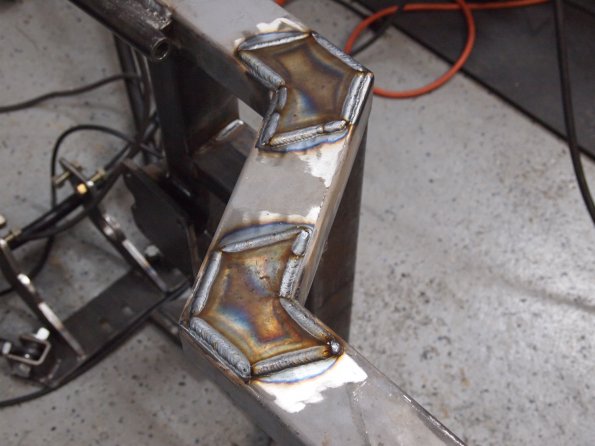
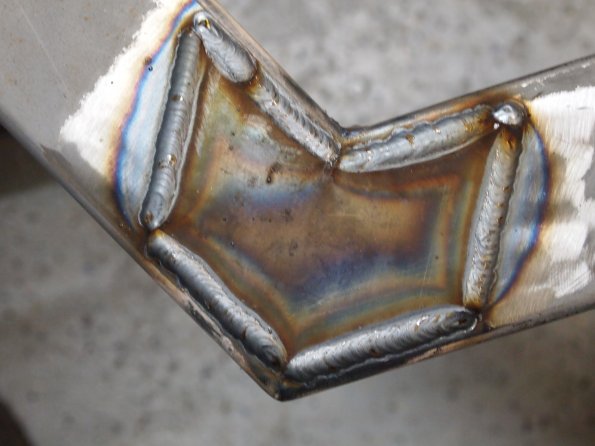
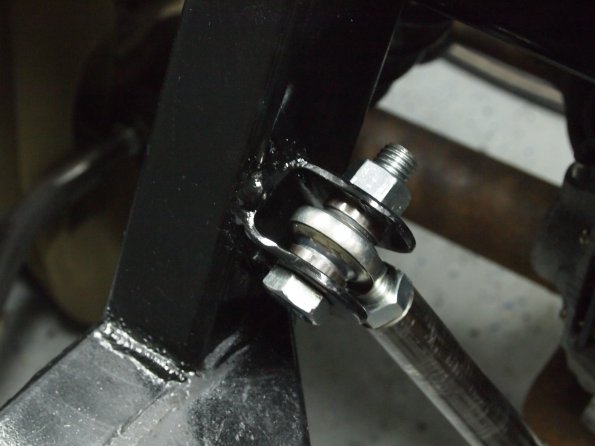
So today I finished up the welding, made my fish plates/flags/tags or whatever they are called. I used some 1/8 cold rolled plate I picked up just for this purpose. After these were done I spent some time cleaning up the spatter smoothing my bad stops and starts.

31%20Mar%202011%20001.JPG_595.jpg


31%20Mar%202011%20002.JPG_595.jpg


I was going to prime it until I plan on painting, which won't be until the summer, but the local paint shop told me if i wanted to seal it until the summer, to throw a coat of paint on it instead. I guess the primer acts as a sponge and will not stop the rust...I did not know that.
 
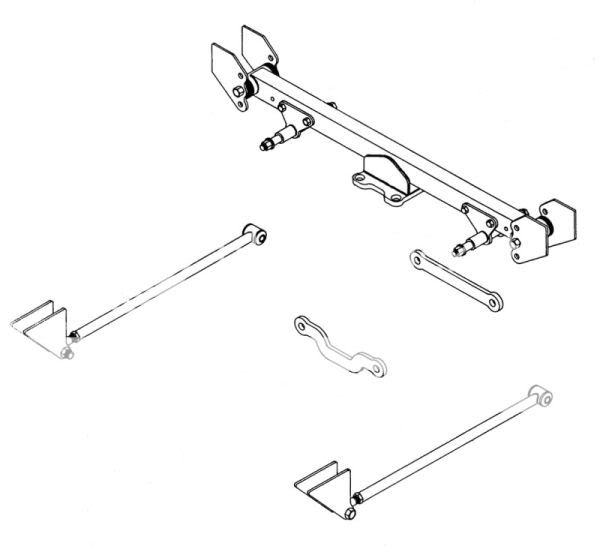
I agree with you,Ted, on the idea of duplicating the basic principles that the engineers at Jag used in mounting the rear axle assembly. I used to make a mounting kit like the drawing that was used in the later model street rods. It had the rubber bushings for sound isolation and the freedom of limited movement. I probably built around 50 of them over the years and never had any problems.

Since we are talking on a T-Bucket website, I would have to disagree that this method is very practical for use in a Bucket that has a pretty conventional frame. The problem is in getting the components that need to be included in the available area. By the time that you get the bushings on the end of the crossmember along with the mounting tabs, the crossmember gets awfully short and the upper mounting points for the coilovers fall outside the confines of the frame. If these are mounted separately on the outside of the frame, it kind of blows the whole idea of the unitized mounting package. If the crossmember is changed so that the bushings at inboard of the ends of the crossmember, the back of the frame starts getting up in the air or else the kickup starts to intrude on the inner space of the pickup bed or turtle deck.

I'm a fan of providing as much adjust ability as possible as you might note, but it is hard to do much of that in mounting a Jag in a Bucket. In addition to the 3 height positions of the whole unit, there are 4 positions on each side for the upper shock mounts.

Just my thoughts on it.

JagMountingKit-2.jpg


Incidentally, If you want to use spring eye bushings, you'll have to get something other than '60-'63 Falcon & Comet models as I exhausted TRW and Moogs supply in the world as best we could find. They fit perfectly in a 2" long sleeve of 1-3/4" x .188 tube :rolleyes:
 
This is my latest version using a P&J HD bushing and sleeve

JagxmbrSmall.jpg


Ron
 
Looks like I need to do a drawing, I will do a rough sketch and send it to George, because he is the very best with this of drawing. The whole unit including the coil-over mounts will fit inside a standard T Bucket frame with no problem, I have done it before, but some years back and my memory is not that great as to exact measurements at the moment... I do have one set of the coils wound to 1/2 strength from stock... I also mount the coil springs in a bit narrower than stock because of the lesser weight and a bit more leverage needed for a great ride, travel stops still need to be installed... And to all that are building at this time, much better to make some changes now. then later, it will not be that bad to make that whole setup bushing mounted... Then getting on the load pedal is not much of a worry, just still made more for comfort and LOOKS than traction... :)
 
Ron,

Very nice looking pieces. They almost look like cast aluminum. Reminiscent of the C4 Corvette rear crossmember.

Ted,

Just get out the old drawing board and have at it. That is a hand drawing the old fashioned way...T-square & triangles. No CAD in that one there. :smashpc:
 
Oh sure NOW you tell me :D

With this rear end having 2.88's in it. Really pounding it hard is not an option!

I have run a higher gear than that (276 final gear) all these years (over 30 years) and it is not been a problem, as a matter of fact, I love it! An old Friend in the racing game once told me to run as high a gear as it will pull... In these light weight cars, a high gear is the answer for the street, and I have run against many cars with real deep gears, and I have had no problems with them, most will spin the tires a bit too easy, in that instant, is enough to a ways ahead, and that is racing for you... :) If you think your engine is not turning high enough RPMs, down shift! That is what transmissions are made for.
 
Thats nice. How wide is that?

This one is the test unit. It's 24" wide. The second one was 21" to fit an exsisting frame. The struts for the pinion have a clevis at the tie bar and a P&J bushing at the frame rail. The trailing arms are much like keepers only the forward end bushing is shaped so the bolt holding it is in line with the bolts that hold the axle swing struts. I used a Krugle adjustable bushing sleeve at the rear that is adjustable. My thought was to make the trailing arm/axle swing arms to act as an "A" arm. The car hasn't been converted yet so sorry to say there aren't any pics of this install.

I did gleam the design from the Corvette crossmember.

Ron
 
With the third member being able to move, (I would bolt 2 brackets to that mount and make the springs move-able also) only other thing needed is the strong radius rod, and it does not need to be in line with the bolts that hold the axle swing struts. Just mounted to the frame same as the stock radius arm... and no lower brace to the frame is needed either ...
 
After being thoroughly reamed by UPS (to the tune of $177.15) my tank arrived. The last major piece. Thanks Ron!

1%20apr%202011%20006.JPG_595.jpg


Along with a preview shot of what the frame will look like once its painted to its final color of black. This is a nice rattle can job to seal the frame from rust.

1%20apr%202011%20003.JPG_595.jpg
 
With the third member being able to move, (I would bolt 2 brackets to that mount and make the springs move-able also) only other thing needed is the strong radius rod, and it does not need to be in line with the bolts that hold the axle swing struts. Just mounted to the frame same as the stock radius arm... and no lower brace to the frame is needed either ...

My thought was with the "A" arm setup, the hub would travel in one arc where as if the trailing arm was bolted to the frame there would be one arc caused by the trailing arm and one caused by the axle swing arm causing a bind at the ends of the arcs. Seems to me the one arc wouldn't have the bind that 2 would have. With the "A" arm type setup, The shock can be mounted to the frame without any binding too as it is traveling in one consistant arc.

Sorry for the hijack Keeper.

Ron
 
On the recommendation of Ted and Gerry, I made some new upper link mounts for the jag. These span the whole frame so should be must stronger then the last set I had. (That weld is not as ugly as it looks in the pic)

9%20Apr%202011%20005.JPG_595.jpg


9%20Apr%202011%20006.JPG_595.jpg


I have been searching for some breakin headers for a while now, so on the off chance, I have a circle track racer that lives around the corner. He was out and about and I asked if he happened to have an old set of sbc headers. "I think I do" goes into his garage and comes out with these:

9%20Apr%202011%20003.JPG_595.jpg


So for a small sum I got some side exit headers and 2 magnaflow 3 inch mufflers. Don't have to worry these burning up...lol
Mount those puppies and lets see what they look like. I'm a little tired of the same old same old roadster or sprint headers. Want to see 'em painted black or orange or something unusual. And could you run quiet oval mufflers or maybe a set of those large round mufflers that i've seen on Ted's big block car. Who sez they got to be chrome? :rulz:
And Keeper, have you given any thought to puttin' a half hood on the car? I still think it would be neat looking.

John

P.S. Ted, what kind of mufflers were they? School bus? Were they quiet?
 
Only too glad to help out. :Looking better all the time.
Gerry
 

     Ron Pope Motorsports                Advertise with Us!     
Back
Top