Garage Merch                Ron Pope Motorsports                California Custom Roadsters               

"Black Dahlia"

Fred,

No worries man, I make noises all the time in mine. I just want to drive mine on the road!!! Like you I thought about the bomber style seats. I think I'll stick to the bench seat for now. It will be the easiest for me to do. I plan on mounting it to the cross bar, hinged on the front so it will lift up from the back. The back I'll make like EXJUNK (I think that's correct) did on his with a 'Z' brace out of aluminum. I'll us the mounting bolts for the bed to attach the brace to.
If the bench seat does not work out, I can always try something different.

I need to see where to make the holes for the brake pedal and e-brake on the body.

I like the progress you have made. Keep at it. If you need any help let me know.

Later,
Paul
 
You got it Paul. As far as my progress, it's slow, but steady. Anything I can do to move forward. Just like with Miss Behavin', I've got plenty of time. Today, I was looking at seats again and I'm still not set on what I want, but this is just playing around with ideas. Once I have the body, I'll make up my mind on what direction I want to go. A bench is practical, but my race theme will dictate my final decision.
 
Hi Fred,
Those rear radius rod are 41.25", that frame has the extended upper rear kick for the 20" bed. That puts the coil bracket 5.25" from the back of the rear crossmember. We use the 37.25" for the 14" bed, 41.25" for the 20" bed and 43.25" for the Sportdeck. That puts the rear wheels in the position of what we think looks best and keeps the radius rod frame brackets in the same location. This one shows the rear frame for the 37.25" rods

CCR Frame Detail 14 inch bed.jpg
 
Thanks for jumping into the conversation, Resinator. Sorry about posting the mis-information. Ironically, the lengths you posted for the varying applications is pretty much what I discovered, when I burned the midnight oil to come up with a good length for my car. What I discovered was length is relative to location and rear vehicle weight. Ideally, the two radius rods would run from the axle bracket and join in the middle near the transmission yoke. As we all know, this would be rather difficult in a T Bucket. So, as has been done for years, the rods are split.

While being split reduces over all effectiveness, that reduction is minimal, as long as the rods achieve some angle from the rear bracket to the frame rails. As long as there is an angle of placement, coming from the axle and going inward to mount on the frame, geometry is maintained. In designing my rear suspension, I'm using your setup as a guide. In this picture, you can see the angle and length of the radius rod.

full


So, after I reconfirmed what I had found on angle and placement. Desired length needed to be determined. On average, 36" (final length of the assembly), seems to be the norm for T Buckets, with CCR's set up being one of the exceptions to the rule. I wondered why there was a difference. What I discovered was that front placement of the radius rod bracket was ideally as close to the trans yoke as possible. So, even though the rods don't meet at the yoke, they can run parallel to the frame rails, as long as they are mounted in close relation to the yoke. This is where the triangle effect is created and maintained in the rear assembly.

Therefore, since my engine and transmission assembly is moved forward, in my extended body application, then a longer radius rod should help with axle movement with minimal binding. Minimal weight on the rear end is also a factor. It'll also look good. So, I'm going with a set up that will have a 40" center to center length. I found some good reading that folks may find useful. If anything, it gives a brief education on how the rear components work in a car using wishbones, radius rods or ladder bars.

http://www.lvvta.org.nz/documents/i...-2011_Rear_Suspension_Radius_Rod_Geometry.pdf
 
Last edited:
Placed order with Ron this morning. Now, I wait for the brown truck. Yes..... waiting for the delivery.:D Nice cap.

 
I understand tipping is the norm in the USA, so she will be walking away with a 20 tucked into her belt, I would bet.
 
Bill-Kestener-T-Bucket.jpg
 
Hmm.......

kirkey_seats.jpg
 
kirkey_insert.jpg
 
Dimensions for Kirkey Vintage seat. These are for the 16.00" wide seat. The above seat is 18.00" wide in the rear section.

kirkey_dimensions.gif kirkey_dimensions.gif
 
I wish the driver for 'Brown' looked like that. I'd be in trouble for sure.....
Those seats are nice. Are you looking to mount them bench style or have them tilt individually?

Now you have me thinking about the possibility of using those...... hmmmm. Another option to mull over.
 
I wish the driver for 'Brown' looked like that. I'd be in trouble for sure.....
Those seats are nice. Are you looking to mount them bench style or have them tilt individually?

Now you have me thinking about the possibility of using those...... hmmmm. Another option to mull over.

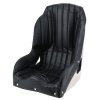
The idea I had for that style of seat was to build a base about 3.00" tall. I'd go with the doorless body. At 24.00" long, I don't think they'll fit inside the CCR interior frame work. Then, make a top and mount the racing seats to that. It would also be possible to have the top in two pieces, so the whole top wouldn't need to be removed to get underneath. The base would be level, since the back angle is built into the seats. At 9 lbs. each, even if they were mounted to a one piece top, it would still be light enough for easy removal. Individually, it would be even easier.

If I did split them, I could make a flat piece to fit on the passenger seats place. I'd have a sort of package shelf, next to the drivers seat. Right now, I'm just looking at options. But, amazingly, these vintage racing seats are actually cheaper than Bomber seats! But, that nice padding is priced accordingly. I haven't sat in that style of seat or it's padding, so I have no idea about the comfort level. But what I do know, is that they're the "look" I was wanting, if I went with a racing style seat.
 
Last edited:
Well, my bank card didn't scream, when Ron ran the order through, so parts are on the way. Just a few more to go from CCR and it'll be time to melt some metal.:D Target date for final parts order is, 8/10/2016! WOO HOO!:D
 
I used the 18°-20° layback and 2.5" raised front from a similar Kirkey seat diagram to allocate interior space in my CAD layout. The only way I could use any of the bomber/racing seats I've seen would be to use one for each butt cheek...LOL.

If I may ask, what is the purpose of replacing the passenger seat with a package tray?

I'm still grasping at straws looking for a seating arrangement that will work for me. Since there is not going to be enough room for anyone else to ride with me, I've considered a removable platform over the passenger side seat area, for my dog to ride on.
 
If I may ask, what is the purpose of replacing the passenger seat with a package tray?

For packages.:D

Ok...ok.... when I had my last T, I drove it ALL the time. For about a year, it was my daily driver. Sometimes I'd stumble on car junk at a friends house and have to make a return trip because I didn't want grease and crap all over my seat. On occasions when I'm feeling like "Johnny Cool Race Car Guy", I'd take the other seat out. Lookin' like a hard ass, drivin' by myself. :rolleyes: That extra seat takes up weight, man!;)

3rd reason... because I can.

At work today, I came up with an idea for a frame made of angle iron, to fit in the seat base, so the seats could be secured. Or, maybe, make the base out of metal and attach it, through the floor and into the frame. The more I think about it, the more I want to do it.
 
Last edited:
Zandoz, I get this image of you cruising and your dogs tongue and ears flappin' in the wind, and it's cool, man.:cool:
 
For packages.:D

Ok...ok.... when I had my last T, I drove it ALL the time. For about a year, it was my daily driver. Sometimes I'd stumble on car junk at a friends house and have to make a return trip because I didn't want grease and crap all over my seat. On occasions when I'm feeling like "Johnny Cool Race Car Guy", I'd take the other seat out. Lookin' like a hard ass, drivin' by myself. :rolleyes: That extra seat takes up weight, man!;)

3rd reason... because I can.

At work today, I came up with an idea for a frame made of angle iron, to fit in the seat base, so the seats could be secured. Or, maybe, make the base out of metal and attach it, through the floor and into the frame. The more I think about it, the more I want to do it.

Most of the time I had the Spridget I drove it with just a driver's seat...the passenger side was always covered by a tonneau cover.

I also had a single seat Renault R8. It was my going to the races car. The passenger side was allocated to a bolted down cot. The driver side rear seat area had a RV fridge that was accessed through the rear door. The front trunk was fitted with a folding table, lounge chair and a hibachi. Spare cloths, driving suit, and a lawn umbrella went under the cot. <sigh> I miss those days.

I'm not sure the configuration, but my seat rizer will be either an extruded aluminum frame with non-structural panels, or a solid HDPE structure. Regardless of the rizer's construction, it will have to have a weatherproof top. The under seat area will be open to the road, and house the brake booster & master, and the air ride tank.
 

     Ron Pope Motorsports                Advertise with Us!     
Back
Top