Ron Pope Motorsports                California Custom Roadsters               

Complete Rewire Project

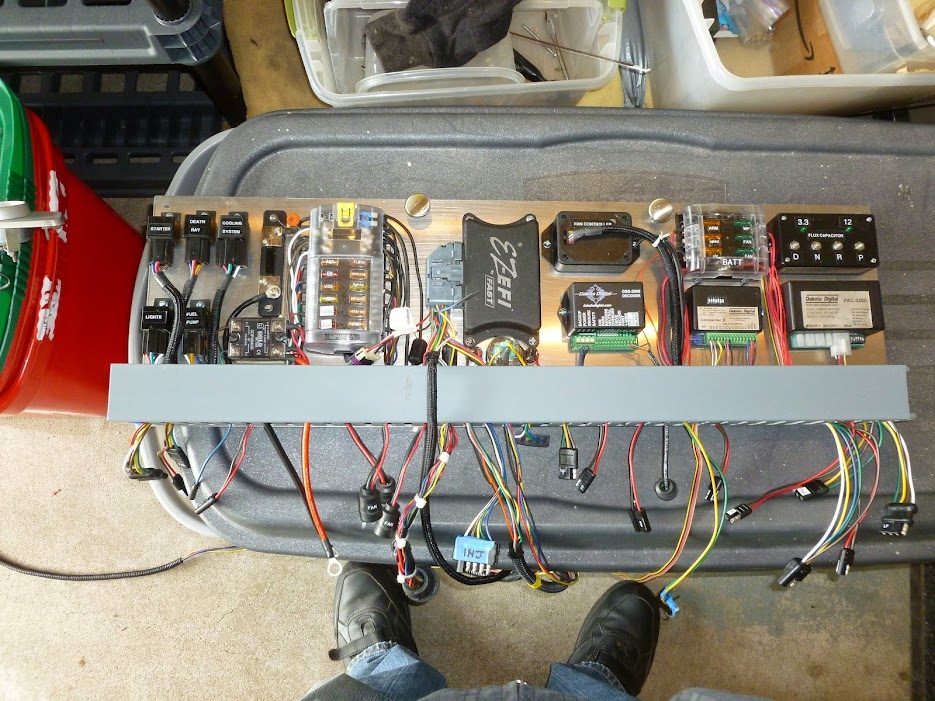
Yes 12 pins is the most for one connector. I bought my kit at WireCare.com for $249.99, the kit number is
"DT-GY-K - DT, Installer Kit w/o Crimper, Gray". You can get the connectors in black, but that's another $50 for the same kit. Also pins and sockets are available in open or solid, nickel or gold. The WireCare kits are solid/nickel.

https://www.wirecare.com/deutsch-kits.asp

Kit Contents:
  • 4 ea. - 2 Contact Connector Sets with Wedgelocks
  • 4 ea. - 3 Contact Connector Sets with Wedgelocks
  • 3 ea. - 4 Contact Connector Sets with Wedgelocks
  • 3 ea. - 6 Contact Connector Sets with Wedgelocks
  • 2 ea. - 8 Contact Connector Set with Wedgelocks
  • 2 ea. - 12 Contact Connector Set with Wedgelocks
  • 8 ea. - DT Series Screw Hole Mounting Clips
  • 100 ea. - 16-18-20 gauge Nickel Plated Solid Sockets/Pins (50/50)
  • 20 ea. - DT Series Sealing Plugs
  • 50 ea. - 14-16 gauge Nickel Plated Solid Sockets/Pins (25/25)
  • 1 ea. - HDT-48-00 Deutsch Crimping Tool (Deluxe Kit Only)
  • 1 ea. - DT/RT-1 Extraction Tool
  • 1 ea. - Heavy Duty 12 x 18 x 3 Steel Divided Storage Case
  • 1 ea. - Illustrated User's Installation Guide
 
I'm wondering if I missed something. Should the PURPLE wire be using a relay???

I'm thinking it's OK, since all the loads on the ignition switch are relay coils and therefore the current going thru the PURPLE wire is very low and does not need to have a relay.

Power,Charging&IgnitionCircuitDrawing13a.jpg
 
I'd be concerned about turning this into the electrical nightmare that is a modern car... I always thought the simpler the better...less to fail....
dave
 
You're quite right, Indy, the ignition switch feeds just 3 relays, a very small load.

I'd be concerned about turning this into the electrical nightmare that is a modern car... I always thought the simpler the better...less to fail....
dave

Dave, Indy and I are competing for the most complicated wiring award:
P1010834.JPG

...I'm up by 2 relays, but he has that data logger thing...
 
If I posted a photo of what I've done so far I would win the most complicated, but loose miserable the cleanest wiring contest.:roflmao:;) hehehe !!!!

Thanks Potvinguy for the confirmation.....believe me I needed that in a big way. Will try to post some pics representative of my trials to wire my console with a Deutsch connector in a few days.
 
I am going to use another Deutsch DT connector, in fact it will take two connectors for the console wiring. Largest connector is 12 pins and I need about 16-18 pins.

FP15_ConsoleLayout_6071.jpg
FP15_ConsoleOpened_6072.jpg

This is only about 1/2 done, still more wires to come yet.

FP15_ConsoleWiring_6074.jpg

Still needs another 3-4 wires before this is complete. Again this will have a Deutsch connector so I can remove the console and shifter when necessary.

FP15_WiresGoingToConsole_6079.jpg
 
Is there a question in there somewhere???:cool:
 
Getting the console wired and the two Deutsch DT connectors done is a milestone for me. To keep track of the 16 wires, I had to make me an Excel table with all the wires with info about where they were coming from and going to in the console. Also included the pin number for each connector.

FP18_ConsoleWiringConnectorPinout.JPG

These connectors come in 2, 3, 4, 6, 8 and 12 pins, therefore I went with two 8 pin connectors for the 16 wires. One connector includes all the wires for the rocker switches plus one wire from the headlight switch (Battery).

FP18_ConsoleConnectors_6095.jpg

The temporary labels made from masking tape were a great help when it came time to wire the connectors.

FP18_SeatAreaConnectors_6094.jpg

FP18_Console&Connectors_6092.jpg
 
I must say a nice job wiring. Thirty two years as a electrician, and I have worked as electronic tech part of that time. You have kept it neat and well documented. You deserve an At-a-Boy !
 
Thanks so very much for that nice comment!

I try, but I was hoping for something like below. These are the real masters
of wiring!!! I saved these as inspiration for my wiring project.

PotvinGuy_Wiring_Panel_Installed03.JPG

WiringOrganizingExample.jpg
 
Hey, Indy, am I right in assuming there will be no wiring in the dash (except for gauge lights)? That is slick.
 
Gauges and light is all there is.

I don't like working under a dash! I'm too OLD to stand on my head anymore.
 
Maybe she thinks it's a pimple that needs to be popped!!! :rolleyes:
 
I'm into the last big section of my wiring..... the dash with 9
gauges. This is what it looks like from the front....

FP07_Dash&Gauges_6105.jpg

FP07_Dash&Gauges_6108.jpg


Now for my problem. I'm trying to come up with a good way
to connect 6 different AEM gauges with their 4 common wires.
Although I think I can skip the Blue RS232 wires, not sure
what I would use them for. Thinking about clipping them short,
but leaving 3 inches just in case.

So how can I connect all 6 AEM gauge white wires, then all the
red wires and finally all the black wires. I could easily cobble
together something, but I want something neat & tidy and
good electrically.

I'm showing just ONE cable below, but there will be SIX of them
when every AEM gauge has it's cable.

How do I bring 6 wires together ?????


FP07_WireComplexity_6110.jpg

Some pictures of your installation for inspiration would be MOST HELPFUL !!!

Comments welcome!!!!!
 
I do an inline splice:
inline_splice.jpg

...use a strip tool to make a 1/2" gap in the insulation of the common wire, then wrap the gauge wire around it and solder. Then slide the tubing over the joint and shrink. Daisy-chain to all gauges, and the common wire ends in the connector. If I never see another butt splice and crimp tool I'll die happy.:)
 
I do an inline splice:

...use a strip tool to make a 1/2" gap in the insulation of the common wire, then wrap the gauge wire around it and solder. Then slide the tubing over the joint and shrink. Daisy-chain to all gauges, and the common wire ends in the connector.

I'm with you, I don't need a dozen red cylinders behind my dash
called BUTT connectors. That's NOT neat and tidy. I like your free
hand drawing, it was worth a 1000 words....thanks! I understand
how a wire stripper can create a gap in the insulation.... done that
myself before. What did you uses to organize the wires as they
make their way across the dash???

Is it OK to run my sensor wires thru a Deutsch DT connector??? I
want to have two connectors that completely disconnect the dash
and make it removable. One 12 pin for the 6 sensors and a 6 pin
connector for the 3 common wires ..... then I have to figure what I
need for the SpeedHut gauges for connectors

Oh my head hurts !!!!!!!!:cry::(
 

     Ron Pope Motorsports                Advertise with Us!     
Back
Top